ALERT CONTENT PLACEHOLDER
​​​​​​ Introducing Skype for Business at UHN Video Thumbnail 

When an email sparks a question or discussion, you can send an instant message to a UHN colleague using Skype for Business. With this new collaboration tool, you can chat, videoconference, share your screen and more.

Access to Skype for Business is available through your Office 365 Dashboard. All UHN staff will be able to use Skype for Business from their desktop as of July 2017. 

Learn how to get started on Skype for Business and communicate your way.

Ready to use the Skype for Business? View and print this guide to get started on the application:

Skype for Business Online from your web browser:Skype for Business icon

Step 1 Go to your Outlook Web App.

Step 2 Click on the icon to open a Skype for Business Online window on the right side of your Outlook Web App screen. This will automatically sign you into your Skype account.


Full Skype for Business application from your UHN computer:

Step 1 Go to your Windows start
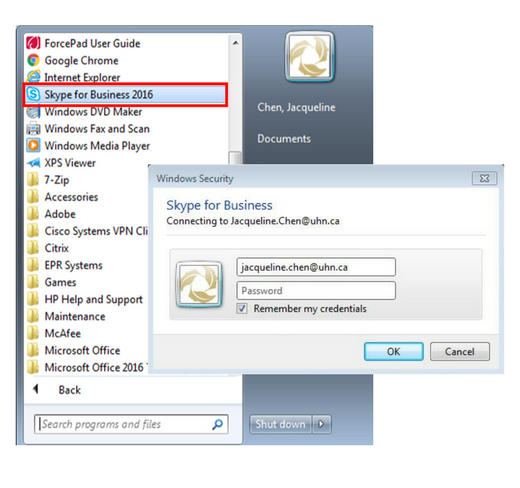
 Full Skype for Businessmenu.

Step 2 From the applications listed, find and click on Skype for Business 2016.

Step 3 You may be prompted to enter your credentials. Enter your primary email and password, and select Remember my credentials.

Follow the below image and associated instructions for an overview of Skype for Business. Click on the numbers for more information. 

Skype for Business navigation

You can manually change your presence status to indicate to availability to your colleagues

Step 1 Click the status menu drop-down arrow below your name on the Skype for Business main window.

Step 2 Select the status you want to show your colleagues.

Step 3 You can also reset your status to update based on your Outlook availability by clicking on the status menu

New email 

Step 1 In the search box along the bottom of your Skype application, type in the name of the colleague you wish to add to your contacts list.

Adding Contact  

Step 2 Right-click the colleague's display name, select Add to Contacts List.

Adding contact 

Step 1 From your Skype for Business window, double click on the colleague's name you want to start a conversation with.

You can also access Skype for Business Online from your Outlook Web App account by clicking on the icon along the top navigation bar. 

Step 2 A new conversation window will open. Type in the message area. 

Step 3 Click Send to send your message to your colleague.

Send instant message  

You can host a Skype meeting through Skype for Business to IM a group of colleagues or share your screen. Please visit Calendar Resources for more information.

Please note: You will not be able to send files through Skype for Business. This function has been disabled for all UHN users. 

Step 1 Open Skype for Business and select the contact you wish to begin a videoconference with. You can search for your contact in your Contacts list or type a name in the search box to find the person you’re looking for.

Step 2 When you hover over the contact’s profile icon, a quick menu will appear. Select the call icon to start the videoconference

Step 3 You can also start a videoconference to an existing instant messaging (IM) conversation. Simply click the camera icon in the window to start your video.

Step 4 An alert will pop up on your contact’s screen, which they can use to accept or ignore your request. If the video call is accepted, the conversation window expands to display the video.

Step 5 To end the videoconference, close the window, or click the hang up button.

Video Conference
Video Conference


If you require any audio or visual equipment for your Skype conferences, such as a Skype headset, please submit a request through the UHN hardware order form found on the intranet.

 Skype for Business allows you to share your screen with colleagues while having an IM conversation.


Step 1 At the bottom of the conversation window, click the Present (monitor) button.
To share the content on your desktop, click Present Desktop.

Please note, when sharing your desktop, everyone in the meeting can see your programs, files, and notifications.

Step 2 To share one or more programs or files, click Present Programs, and then select the specific​ program or file. This is a good option if you have files on your desktop you do not want meeting attendees to see.

Share Screen


Step 3 Follow the prompts and select Present to begin sharing your screen. You will see a sharing toolbar on the screen you choose to share.

 
Share Screen 
 

On the sharing toolbar, on top of the screen, use any of these options:

  • Click Stop Presenting when you are done sharing your screen.
  • Click Give Control to share control of your desktop or program with the participants. 
  • Click the pin to hide your toolbar.

Step 1 Open Outlook and go to your calendar.

Step 2 From your menu ribbon, click New Skype Meeting.

Step 3 A Skype meeting link will appear in your message. This allows attendees to join a group Skype conversation during the meeting.

If you have audio conferencing capabilities, call-in details will appear in your invite.

Step 4 At the top of the meeting window, click Send.

Skype meeting
Skype meeting


{[name]}

{[description]}
 
Quicklinks
Back to Top